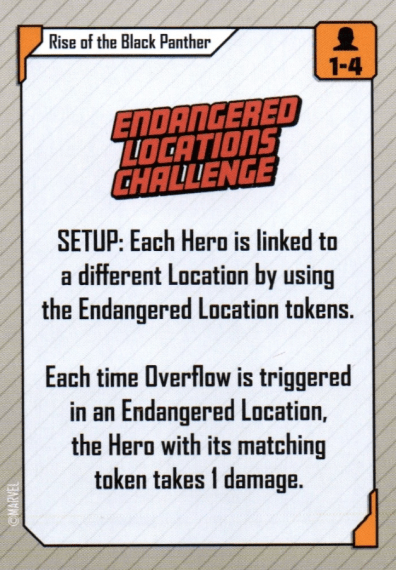
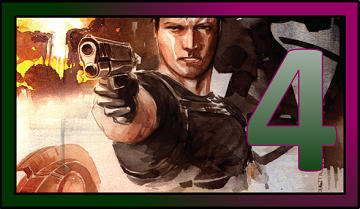
This is an optional card included in the Rise of the Black Panther expansion that adds an extra challenge. After players are comfortable with this set and the overall game’s play, feel free to add these to your game. This specific card can be used with any Marvel United villain but was designed with Killmonger in mind.
Setup: Each Hero is linked to different Locations by using the Endangered Location tokens. Each time Overflow is triggered in an Endangered Location, the Hero with its matching token takes 1 damage.
The Endangered Locations Challenge deals additional damage to Heroes, so players must be aware of their linked Location’s status.
How Killmonger Plays: Killmonger has above average health, so even if the heroes make him vulnerable to damage, you’ll need a lot of damage. His gameplay centers around blocking thug/civilian spaces on Locations with Crisis Tokens and can make the game state difficult to navigate.
Villainous Plot: The Heroes lose when 4 or more Locations have 3 or more Crisis Tokens.
How he does this? Killmonger can place Crisis Tokens in a variety of ways: his BAM! effect, overflow effect, Threats, and Masterplan cards. It’ll be difficult to predict which Locations will get these tokens, so Locations can fill up quickly. You’ll need to move fast and tend to vulnerable Locations.
BAM!: Deal 1 damage to each Hero in Killmonger’s Location. Then, replace the leftmost civilian/thug token there (if present) with a Crisis Token.
Killmonger’s damage isn’t a big issue. But he has ways of supplementing this damage that will make him more likely to KO heroes. The BAM! does require a civilian/thug token to convert into a Crisis Token, so the effect can fizzle. And if the effect does convert a civilian/thug token, it’ll mean that you’ll have one less civilian or thug token to finish the Rescue Civilian or Defeat Thug missions.
Killmonger’s Crisis Token placement can vary wildly from game to game. He could concentrate it in a few locations or spread out the tokens. But there are ways for the tokens to cascade, especially with Killmonger’s Overflow effect.
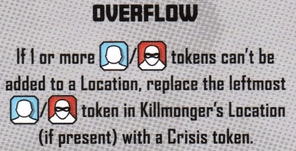
Overflow: If a civilian or thug token can’t be added to a Location, replace the leftmost civilian/thug token in Killmonger’s Location (if present) with a Crisis Token.
Again, this is bad for the reasons mentioned in Killmonger’s BAM! effect. I would suggest playing with the Great Mound Location (included in the Rise of the Black Panther expansion), since its End of Turn ability allows players to discard a Crisis Token.
Threats
Killmonger has 2 copies of 3 different Threat Cards, none of which are henchmen.
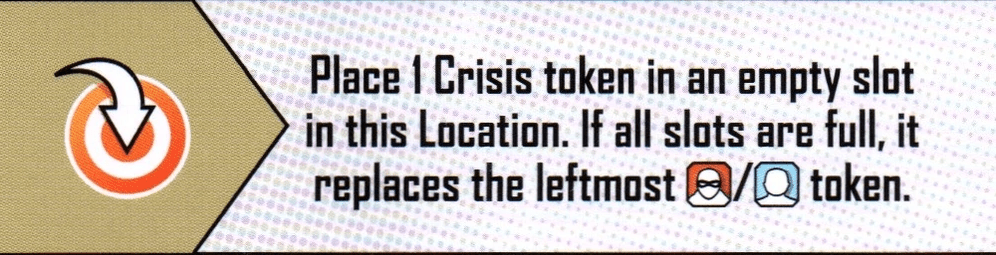
Weapon Smuggling (Threat) Clear: 3 Heroics Triggered Effect (Killmonger finishes movement on this Location): Place 1 Crisis Token in an empty slot in this Location. If all slots are full, it replaces the leftmost thug/civilian token. “Weapon Smuggling” is the only effect Killmonger has to add Crisis Tokens to an empty slot. “Weapon Smuggling” is dangerous. It contributes to Killmonger’s win condition and makes overflow easier. A Location can gain 3 tokens if Killmonger lands there (1 from “Weapon Smuggling,” 1 from his BAM! effect, and 1 from overflow. Clear “Weapon Smuggling” as quickly as possible.
Assassination Attempt (Threat) Clear: 3 Heroics Constant Effect: Heroes ending their turn in this Location take 1 damage.
“Assassination Attempt” provides more consistent damage than anything players can find in the core set, but it isn’t that deadly.
Note: If you used a Location’s End of Turn ability that can teleport you to another Location, your Hero will skip the window when “Assassination Attempt’s” damage would occur, since they will have ended their turn at a different Location. You can and should use this to your advantage.
Mercenaries (Threat) Clear: 3 Heroics Constant Effect: Each thug in this Location requires 2 damage to be defeated
“Mercenaries” uses an effect popular in Marvel United: lower a player’s efficiency. You can clear this threat before attacking thugs.
Master Plan Deck
Movement: Killmonger has the same total movement and distribution of movement as the core set villains. His movement predominantly shows up in three cards. The rest of his movement is 1 and 0 with a couple of 2s thrown in. Since this is the case, Killmonger is predictable in terms of his movement.
Civilians: Killmonger adds a staggering amount of civilians. Most of these will come in four cards where he places two civilians at his Location and the Locations adjacent to him.
Thugs: The number and distribution of thugs Killmonger adds is more in line with the core set villains, but sheer number of tokens between civilians/thugs makes Overflow very likely.
BAM!: Killmonger has BAM! effects on 7 of his 12 cards, so just above half. The combination of him adding so many civilian/thugs and using more BAM! effects to replace civilian/thug tokens into Crisis Tokens plays into his win condition.
Special Effects on Cards
1) Duel: Killmonger has text instead of his usual Move. We’ll begin with his Move text. Move: Move clockwise to the next Location with any Heroes. Duel: Deal 2 damage to 1 Hero in Killmonger’s Location (Heroes choose).
Most damage sources don’t deal 2 damage in a single shot. And the ones that did deal 2 damage in the core set (like Crossbones) could be avoided. There is no avoiding “Duel.” One Hero will receive 2 damage. Thankfully, there are only 2 copies of “Duel” in Killmonger’s deck.
If players stick together, “Duel” isn’t as deadly. The player with the most health can guard players with less. The problem comes when players split their party and the combination of “Duel” and Killmonger’s “Assassination Attempt” Threats.
2) Overthrow: Move to the closest Location with the most civilian tokens and replace all civilian tokens there with Crisis Tokens. If there are no civilian tokens in any Location, move to the next one clockwise.
Like “Duel,” Killmonger has 2 copies of “Overthrow” is his deck. You’ll need to be careful with the amount of civilian tokens are on the board until both copies of “Overthrow” have been played. Also like “Duel,” “Overthrow’s” effect will most likely happen; it’ll trigger if ANY civilian tokens are in play. And keep in mind that Killmonger can place a heap of civilian tokens in a single turn.
General Strategy
Since Killmonger adds so many civilians and all his Threat cards require Heroics, you’ll want to play Heroes with high Heroics. But Killmonger also has a ton of health. So, you’ll also want Heroes who can deal a lot of damage in a single action and have those Heroes save their Attack after Killmonger is vulnerable.
Killmonger will frequently add Crisis Tokens to Locations, but he needs to place 3 each on 4 different Locations to win. It’s the luck of the draw as to how he’ll add Crisis Tokens. I suggest prioritizing “Weapon Smuggling” Threats and large groups of civilians who could be converted with Killmonger’s “Overthrow.” I’d also ignore the Defeat Thugs mission and complete the Clear Threats and Rescue Civilians missions, saving your Attack for Killmonger himself.
If you’re playing with the Great Mound Location, be sure to clear whatever Threat card is on that card so you’ll have its End of Turn ability to discard Crisis Tokens. Shuri also works extremely well in conjunction with Great Mound. In fact, the three Heroes included in the Rise of the Black Panther expansion work well as a team and against Killmonger. Black Panther has plenty of Move for players to move to Locations with a lot civilians, and Winter Soldier can bank Attack tokens to unleash them on Killmonger when the time is right.
Remember to time completing the first and second missions as close together as possible to avoid the villain speeding up too soon.
Real Name: Ronan the Accuser First Comic Book Appearance:Fantastic Four (August 1967) Affiliations in Comic Books: Annihilators, Galactic Council, Kree, Star-force
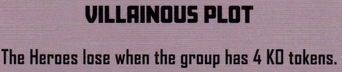
How Ronan Plays: Ronan actively hunts the Heroes. His main way of winning is KOing Heroes. This can satisfy his Villainous Plot (extra win condition) of giving the Heroes 4 KO tokens, but the Heroes can also lose if they run out of cards; Heroes take damage by discarding cards.
Villainous Plot: The Heroes lose when the group has 4 KO tokens.
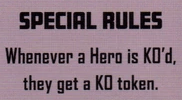
Special Rules: Whenever a Hero is KO’d, they get a KO token
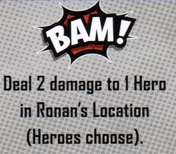
BAM!: Deal 2 damage to 1 Hero in Ronan’s Location (Heroes choose).
Ronan has tremendous damage output. None of his Threat cards have a BAM! effect, so he doesn’t have the same cascading effect that some Marvel United Villains have. But his BAM! effect deals 2 damage instead of the usual 1 and he chases Heroes around the board. His Overflow effect also contributes to his damage.
Overflow: If a civilian or thug token can’t be added to a Location, deal 1 damage to 1 Hero for each token that can’t be added (Heroes choose who gets each damage).
Ronan’s Overflow ability furthers his damage output. Unlike many other Overflow abilities, his ability triggers each time a token cannot be placed. And since he has plenty of cards in his Master Plan deck that add several Thugs (specifically “Kree-Law”), several Overflow effects can trigger each round.
Threats
Ronan has 2 copies of 3 different Threat Cards.
Jailbreak (Threat) Clear: 1 Move; 1 Heroics; 1 Attack Constant Effect: Heroes using a Move to leave this Location must use Two Move instead.
“Jailbreak” makes leaving the Location more difficult; it decreases a Hero’s efficiency. What is unique with this effect is that Heroes need 1 Move, 1 Heroics, and 1 Attack to clear this Threat, instead of the customary 3 Heroics.
Kree Elite Force (Threat) Clear: 3 Attack Constant Effect: Each Thug in this Location requires 2 damage to be defeated.
Again, this effect decreases a Hero’s efficiency, but this time “Kree Elite Force” targets a Hero’s ability to defeat Thugs. And like “Jailbreak,” “Kree Elite Force” doesn’t require the customary 3 Heroics to clear the Threat. You’ll need 3 Attack.
Space Ambush (Threat) Clear: 1 Move; 1 Heroics; 1 Attack Constant Effect: Heroes starting their turn in this Location take 1 damage.
“Space Ambush” is yet another way Ronan deals damage to Heroes. If heroes are unlucky and begin the game on a Location with “Space Ambush,” they will begin the game with 1 damage. This coupled with the possibility of Ronan landing on the Heroes on the first turn can put a Hero in danger of being KO’d on their first turn.
Like “Jailbreak,” it takes 1 Move, 1 Heroics, and 1 Attack to clear the “Space Ambush” Threat. This Threat is the most deadly of the three and should be player’s top priority to clear.
Master Plan Deck
Movement: Ronan has an odd manner of Movement. He has two cards where he doesn’t move at all and two other cards where he avoids Heroes. The rest of his Movement will place him on Location with Heroes and he will most likely use his BAM! effect.
Civilians: Ronan adds an average amount of Civilians; he focuses more on adding Thugs.
Thugs: Ronan would add an average amount of Thugs, too, but his two cards with the “Kree-Law” effect adds a Thug to every Location. That’d be a whopping 6 Thugs in one turn. This can easily cause Overflow, which can in turn cause extra damage.
BAM!: Ronan uses his BAM! effect on just over half of his cards. This paired with the fact that Ronan will most likely follow Heroes from Location to Location will add to his damage potential.
Special Effects on Cards
1) Kree-Law: Add a Thug to every Location.
“Kree-Law” adds a whopping 6 Thugs to every Location. This can easily trigger an Overflow, and each one of Ronan’s Overflow effects will deal an additional damage. Ronan himself will not BAM!, so he won’t deal damage directly. Note: The movement text that accompanies “Kree-Law” is the only one where Ronan moves away from the Heroes.
2) Cosmi-Rod: Deal 1 damage to each Hero in Ronan’s Location. Ronan will move toward Heroes with “Cosmi-Rod.” Neither copy of the two cards with “Cosmi-Rod” have a BAM! effect. But this ability has the potential to deal even more damage than Ronan’s BAM! effect during a 3 or more-player game and those players stay on the same Location. “Cosmi-Rod” deters players from sticking together.
And like the “Space Ambush” Threat above, if Ronan plays this card during the first turn, he will land on the Heroes’ starting Location and deal damage to each Hero there.
General Strategy
Ronan is one of the more difficult villains to defeat, in part because he will hunt down Heroes and doles out a lot of damage. There are two main ways to try and defeat him: Pure Aggro and Sustain. Let’s start with Pure Aggro.
Pure Aggro: This is the easier and faster of the two methods. The Heroes triple down on Attack. Ronan has a fair amount of health, he adds quite a few Thugs with his Master Plan cards, and his Threats require at least 1 Attack to clear with one of his Threat card types requiring 3 Attack. With this strategy, Heroes forgo Heroics (you won’t need much) and try to finish the Clear Threats and Defeat Thugs missions.
The “Space Ambush” Threat gets top priority regardless of which strategy you use, because it deals additional damage to the Heroes. The ”Kree Elite Force” Threat can be tempting, especially if there are a lot of Thugs on the Location with this Threat, but it requires 3 Attack to clear, and the Heroes may want to save their attack Thugs and Ronan himself. “Jailbreak” is more annoying than anything else.
But the Heroes may find themselves splitting the difference between “Kree Elite Force” and “Jailbreak” because speed is of the essence. Unless you have a lot of Move, you’ll most likely clear the Threats closest to you at the beginning of the game. Remember to time completing the first and second missions as close together as possible to avoid the villain speeding up too soon. You want to give Ronan as few turns as possible.
Fortunately, the Guardians of the Galaxy expansion has a couple of great options: Rocket and Gamora. Star-Lord can also grant his teammates extra tokens and that can always help. Any other high Attack character or character who gives out tokens is a good option (Iron Man, Captain America, and Hulk from the core set). But if you have the Kickstarter exclusive Drax, he makes a great Aggro option.
The Aggro option should only take 3 or so turns. If the game lasts longer than 3 turns, you’re chances of winning may decrease.
Sustain: This strategy is far more difficult to pull off and will require more than a little luck. Players can pick the Heroes who can avoid damage (ones like Ant-Man and Wasp from the core set) and attempt to weather Ronan’s attacks. The best way to ensure that Ronan will attack one of these characters while they have their “Shrink” abilities active is to have these Heroes occupy the same Location as Ronan. Ronan won’t move to the nearest Hero if he’s already on a Location with a Hero.
Since you won’t be committing to Attack all the way, you will most likely opt to finish the Rescue Civilians and Clear Threats missions. When clearing threats, you’ll still want to prioritize “Space Ambush,” but “Jailbreak” may be the clear second option. The “Kree Elite Force” Threat will require too much Attack that you’ll need for Ronan.
The Sustain option will last longer than the Aggro option. Games of this kind will most likely last 4 or more turns.
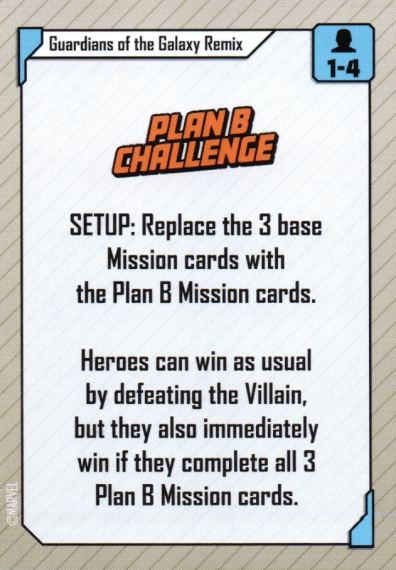
This is an optional card included in the Guardians of the Galaxy expansion that adds an extra challenge. After players are comfortable with this set and the overall game’s play, feel free to add these to your game. This specific card can be used with any Marvel United villain but was designed with Ronan in mind.
The card reads:
Setup: Replace the 3 base Mission cards with the Plan B Mission cards. Heroes can win as usual by defeating the Villain, but they also immediately win if they complete all 3 Plan B Mission card.
The Plan B Mission cards require 12 Civilians or Thugs (instead of the base 9) to complete these missions and Clear 6 Threats (instead of the base 4) to complete the Clear Threats mission.
The missions function as usual. If you finish one mission, the Villain becomes “under pressure” and will act after every 2 hero turns and can receive damage after the Heroes finish a second mission.
But instead of drawing a card for finishing the third mission, Heroes immediately win the game.
This is an optional card included in the Tales of Asgard expansion that adds an extra challenge. After players are comfortable with this set and the overall game’s play, feel free to add these to your game. This specific card can be used with any Marvel United villain but was designed with Loki in mind.
The card reads:
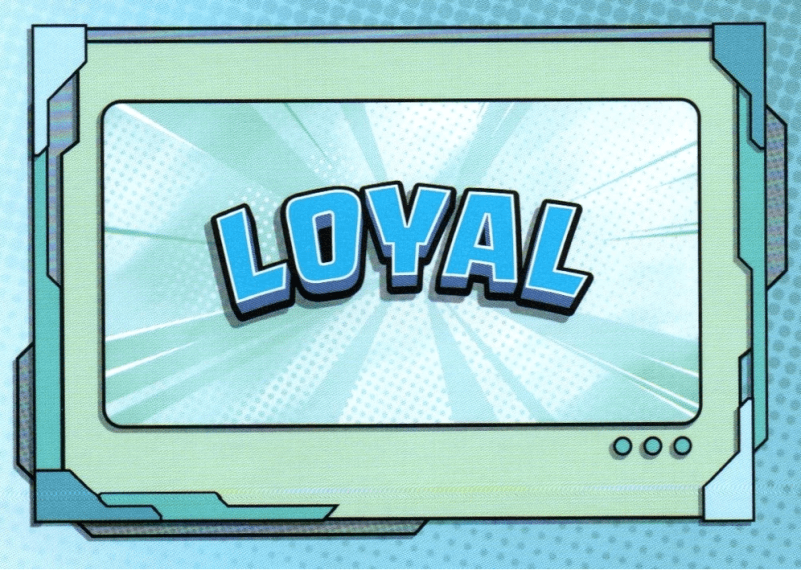
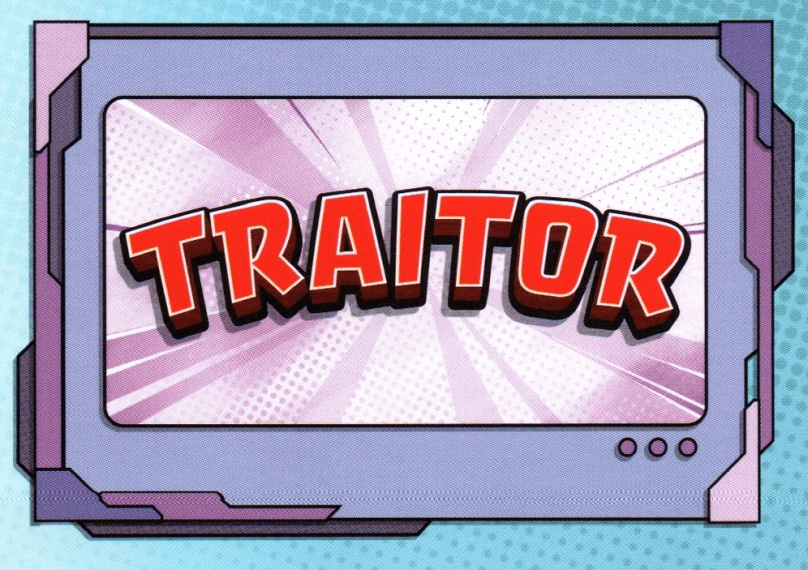
Setup: Each player gets 1 Allegiance card (which will either say Loyal or Traitor), 1 Eye token, and 1 Wild token.
A Hero may choose to play their Hero card facedown to discard their Eye token.
Once 2 Missions are completed, players guess the Traitor. If correct, gain 1 Wild token. Loyal Heroes still with an Eye token take damage until KO’d.Traitor is removed and now plays the Villain, drawing 2 Master Plan cards and playing 1 each turn.
Essentially, one of the Heroes playing the game is Loki (or whoever the villain is) in disguise and will assume the role of the villain after the guess takes place.
This Challenge Card only works at play counts of 3 or more. The “Traitor” Allegiance card will be in play no matter what and the rest of the cards (for the remaining players) will be “Loyal.”
How Loki Plays: Loki delays the Heroes long enough to run through his deck. Half of his effects create roadblock to prevent the Heroes from winning, while the rest help him play more Master plan cards face down. As soon as any deck, including the villain’s deck, runs out of cards, the Heroes lose.
Villainous Plot: Loki has no Villainous Plot. Instead, he has Special Rules
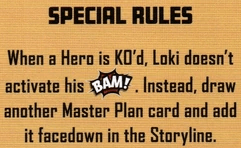
Special Rules: When a Hero is KO’d, Loki doesn’t activate his BAM!. Instead, draw another Master Plan card and add it facedown in the Storyline
BAM!: Deal 1 damage to each Hero in Loki’s Location.
Loki’s damage isn’t great, but he ignores the normal rules for KOing heroes. Rather than activating his mediocre BAM! effect again, he plays another Master Plan card face down which hastens the game. KOs dramatically reduces the time heroes have to win. But Loki’s BAM! effects won’t cause a chain reaction of other BAM! effects.
Still, Loki has other ways of dealing damage, through his Threat cards and a nasty tandem of cards in his Master Plan.
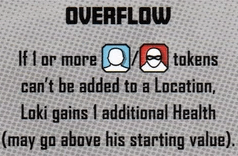
Overflow: If a civilian or thug token can’t be added to a Location, Loki gains 1 additional Health (may go above his starting value).
It doesn’t matter how many tokens can’t be placed due to Overflow, Loki will gain a single health per location that Overflows. Not the worst thing. But if you don’t control the locations, Loki’s additional health can add up. The more health Loki has, the longer it will take for the heroes to win. Yet another way Loki prevents the heroes from winning.
Threats
Loki has 2 copies of 3 different Threat Cards.
Frost Giants (Henchman) Health: 5
BAM!: Deal 1 Damage to each Hero in this Location. “Frost Giants’” simple BAM! effect should look familiar. While they give heroes with heavy Attack something to do in the early game, they function as a distraction. Loki is good at distractions. The “Frost Giants’” effect is easy to avoid, and they have a lot of health for henchmen. This is a low priority Threat but could be necessary to defeat depending on who your heroes are (hint: you’re playing heroes with high Attack).
Master Trickster (Threat) Clear: 3 Heroics Constant Effect: If Loki takes any damage while in this Location, each Hero in this Location also takes 1 damage.
“Master Trickster’s” effect only matters late in the game, when heroes can damage Loki. Heroes have control over this Threat’s effect, too. If a hero with low health occupies the same space as Loki, it may not be a good idea to damage him at this Location. No one likes to get KO’d. But no matter how much damage you deal Loki, you will only receive one damage in return with “Master Trickster.” So, high damage turns could be worth the one damage retribution.
Illusion (Threat) Clear: 3 Heroics Constant Effect: Loki can’t take any damage as long as he is in this Location.
“Illusion” is another Constant effect that only matters late game. This can be a huge problem because few effects can move a villain from their Location. Even so, Loki only has one card with 0 movement. He’s unlikely to stay in one of these Locations for long, but it’s worth noting that Loki does have one Master Plan card in his deck “Master of Illusions” that allows him to warp to the nearest, active “Illusion” Threat. Because of its effect “Illusion” is the highest priority Theat to discard before Loki becomes vulnerable.
Master Plan Deck
Movement: Loki averages 2 Movement each turn. He is 33% faster than any of the core set villains. His movement varies, only have 1 card speeds of 4 and 5, 2 cards with speeds of 3 and 0, and 3 cards of speeds 1 and 2. Loki may be the most unpredictable villain in terms of movement.
Civilians: Loki adds civilians comparable to the core set villains. But he does have a few nasty cards that can add 4 in a single turn.
Thugs: Loki slightly favors adding thugs over civilians, but every card that does add thugs adds them 4 at a time (two in Loki’s Location and one in the adjacent Locations).
BAM!: Loki has a BAM! effect on all but three of his cards. One of the non-BAM! cards adds a whopping 7 tokens (split between civilians and thugs). Fortunately, Loki’s BAM! effect isn’t that intimidating but his constant movement and BAM! effects should keep Heroes on their toes.
Special Effects on Cards
1) Spread Discord: Each Hero not alone in their Location takes 1 damage. If all Heroes are alone, draw another Master Plan card and add it facedown in the Storyline.
“Spread Discord’s” second ability (the one that occurs if all Heroes are alone) can hasten the end of the game and bring Loki closer to his win condition. This is the worst outcome for the heroes. One damage per lone Hero doesn’t help either. If any of the damage results in a KO, that would be another Master Plan card added facedown in the Storyline. Note: both copies of “Spread Discord” have a BAM! effect, so it’s possible for it to do 2 damage to heroes at Loki’s location if there are more than one of them.
2) Sorcery: Each Hero alone in their Location takes 1 damage. If no Hero is alone, draw another Master Plan card and add it facedown in the Storyline. “Sorcery” is basically the reverse of “Spread Discord.” “Sorcery” is also paired with a BAM! effect so this card can deal 2 damage to a single hero at Loki’s Location.
The effects of “Spread Discord” and “Sorcery” force the heroes to consider whether they stay together or spread. There are two copies of each of these cards. If you’ve seen both of either “Spread Discord” or “Sorcery,” you can respond accordingly. But Loki adds some of his cards facedown in the Storyline. You may not know if a certain card is already in the Storyline. There goes Loki fooling everyone again.
Special Movement: Loki has one card in his deck with the “Master of Illusions” Movement. It reads, Move clockwise to the next Location with an “Illusion” Threat card. If both “Illusion” Threat cards are discarded, Loki doesn’t move.
General Strategy
Loki can be confusing in the early game. You won’t know if you should stay together or spread out. Both can be a gamble. None of Loki’s Threat cards impact the early game, but I suggest taking out the “Master Trickster” and “Illusion” Threats to make the late game easier and then taking out thugs. Keep an eye on the tokens. Loki places fewer Civilians and if any of them get played facedown, you may not be able to complete the Rescue Civilians mission.
A mixed team works well with Loki. He doesn’t have the most health—unless he had a handful of Overflows during the game. So, you may not need a heavy Attack hero. But if you do have a heavy Attack hero, that hero can take down the “Frost Giants.”
Keep an eye on the “Spread Discord” and “Sorcery” special effects. Even if there’s one faceup in the Storyline and a handful of facedown Loki cards, you can gamble that one of the facedown cards is a “Spread Discord” or “Sorcery.” You may need press your luck because Loki will try to end the game before you can win.
Remember to time completing the first and second missions as close together as possible to avoid the villain speeding up too soon.
This is an optional card included in the Enter the Spider-Verse expansion that adds an extra challenge. After players are comfortable with this set and the overall game’s play, feel free to add these to your game. This specific card can be used with any Marvel United villain but was designed with Green Goblin in mind.
The card reads:
Setup: Place 1 Calendar Token on the Villain’s Location and on each Location adjacent to the Heroes.
When a Hero in a Location with any Calendar performs any actions other than Move, they get 1 Cell Phone Token that turn.
A Hero may use a Heroics to move any Calendar token.
A Hero with 3 Cell Phone Tokens is Exposed: Take 1 Damage. And play your next card facedown.
“Secret Identity” simulates Spider-Man’s alter ego. Moving the Calendar tokens mimics Peter juggling things in his personal life, while the “getting exposed” consequence is a common storyline with Green Goblin and Spider-Man.
It does take 3 Cell Phone Tokens to expose a Hero’s secret Identity, so Heroes can work around this extra constraint. But Calendar tokens can never be discarded, only moved, and they will take up half of the Locations.
Real Name: Norman Osborn First Comic Book Appearance:The Amazing Spider-Man (July 1964) Affiliations in Comic Books: Cabal, H.A.M.M.E.R., Oscorp, Sinister Six, Thunderbolts
How Green Goblin Plays: Threat cards do not begin the game on any Locations, instead they are set aside in a Threat card deck and Green Goblin adds them to Locations through his BAM! and Overflow effects. This effect plays into Green Goblin’s Villainous Plot. If all Locations have a Threat card, the Heroes lose. But Green Goblin also deals far more damage than any core set villain, especially if either copy of his “Goblin Formula” has been played. Additionally, Green Goblin can’t be damaged if he has a “Kidnapped” Civilian on his Villain dashboard.
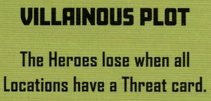
Villainous Plot: The Heroes lose when all Locations have a Threat card.
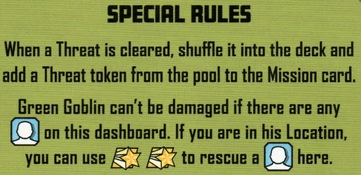
Special Rules: When a Threat is cleared, shuffle it into the deck and add a Threat token from the pool to the Mission card. Green Goblin can’t be damaged if there are any Civilian tokens on this dashboard. If you are in his Location, you can use Two Heroics to rescue a Civilian here.
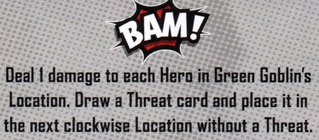
BAM!: Deal 1 damage to each Hero in Green Goblin’s Location. Draw a threat card and place it in the next clockwise Location without a Threat.
Green Goblin begins the game with the same damage as most other Marvel United villains, but his “Goblin Formula” can boost his damage to three for a single BAM!, which means that he can KO a hero with one BAM!. His henchmen complicate the issue further by providing additional damage. One (Kraven) will hunt players around the board to deal them damage.
Each one of Green Goblin’s Master Plan cards has a BAM!, so he will be triggering these effects every round. His other effect “Draw a Threat card and place it in the next clockwise Location without a Threat” plays into his win condition. This ability pairs nicely with his Overflow effect.
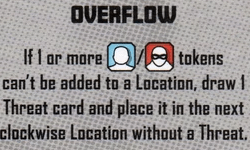
Overflow: If a civilian or thug token can’t be added to a Location, draw 1 Threat card and place it in the next clockwise Location without a Threat.
Green Goblin places a fair amount of Civilians and Thugs each turn, so Overflow can occur and when it does, he places yet another Threat on a Location without one. Again, this hastens Green Goblin’s win condition.
Note: It doesn’t matter how many Civilians and/or Thugs Green Goblin cannot place on a Location, he will only add 1 Threat at one Location without one for each Location that triggers the Overflow effect.
Threats
Green Goblin has 2 copies of 1 Threat Card (“Corporate Thugs”) and 1 copy of 4 different Threat Cards.
Electro (Henchman) Health: 4
BAM!: Deal 1 Damage to each Hero in both adjacent Location.
Unlike many henchmen, “Electro” deals damage to Heroes in adjacent Locations. By himself, “Electro” isn’t a big threat, but he compounds the abilities of each of the other villains. Green Goblin hops around the board erratically and deals damage each round, “Kraven” chases Heroes and deals damage, the tank of a henchman “Lizard” deals damage to Heroes at his Location, and “Electro” hits the ones adjacent to his Location.
The combination of all four damage sources makes avoiding damage difficult. “Electro’s” effect of damaging Heroes adjacent to him makes him an obvious henchman to keep in play; you can avoid other damage (besides Green Goblin) by sticking to “Electro.”
Kraven (Henchman)
Health: 4
BAM!: Move this Threat to the next clockwise Location with any Heroes and no Threat (if possible). Deal 1 damage to each Hero in that Location. As I said before, “Kraven” will hunt down Heroes. His effect is an odd one and may not be triggered. Even if a Hero is at his Location, he will try to move to a Location without a Threat and a different Hero. If one doesn’t exist, he will stay put. Players can avoid “Kraven” by staying on Locations with a Threat, but they could put themselves in danger of getting damaged by a different source.
If you have the Move to reach “Kraven,” you may consider taking him out quickly.
Lizard (Henchman) Health: 5 BAM!: Deal 2 damage among Heroes in this Location (Heroes choose how to split the damage).
Players have a small amount of control with how “Lizard” doles out his damage. If a Hero has less health (fewer cards), another player can take the hit. What makes “Lizard” more difficult is his increased damage and the fact that he will trigger each round (each of Green Goblin’s cards has a BAM!) and his above average health. 5 isn’t that crazy, but when he’s accompanied by two other henchmen and a villain with decent health, 5 can be a little more than players would want to invest in a single henchman.
“Lizards” increased health, the fact that he doesn’t move, and only attacks Heroes at his Location make him a lower priority henchman to defeat.
Corporate Thugs (Threat) Clear: 3 Heroics Constant Effect: When this Threat is placed, add 1 Thug token to this Location. Each Thug in this Location requires 2 damage to be defeated.
“Corporate Thugs” uses a familiar effect “Each Thug in this Location require 2 damage to be defeated.” It essentially makes Thugs more difficult. But “Corporate Thugs’” first effect “When this Threat is placed, add 1 Thug token to this Location” spices up this Threat. More Thugs may tempt Heroes to clear this Threat before attacking any Thugs. Note: After the Heroes clear “Corporate Thugs,” Thugs can be defeated with one damage. But this first effect can also cause Overflow, which can then cause Green Goblin to place another Threat and get closer to villain victory.
Using Civilians as Shield (Threat) Clear: 3 Heroics Constant Effect: Green Goblin cannot take any damage as long as there are any Civilian tokens in this Location.
“Using Civilians as Shield” only affects the late game when Green Goblin can be damaged (at least 2 missions are cleared). Simply put, Green Goblin becomes immune to damage if Civilians exist at this location. You may consider rescuing Civilians at this Location (if any exist) or if there are more Civilians than the Heroics it would take to clear this Threat, you can clear this Threat.
Note: If no Civilians are present at this Threat’s Location, Green Goblin can receive damage.
Master Plan Deck
Movement: Green Goblin averages 2 Movement each turn. He is 33% faster than any of the core set villains. His movement varies, only have 1 card speeds of 4 and 5, 2 cards with speeds of 3 and 0, and 3 cards of speeds 1 and 2. Green Goblin may be the most unpredictable villain in terms of movement.
Civilians: Green Goblin adds slightly more civilians than the core set villains. But he only has 4 cards in his deck that add Civilians; each of these cards either adds 4 or 6 Civilians in a single turn. This can become an issue with Green Goblin’s BAM! effect and his “Using Civilians as Shield” Threat Card.
Thugs: Just like Civilians, Green Goblin adds slightly more Thugs than the core set villains, and he only has four cards where he does so. Four cards in Green Goblin’s deck add Thugs and they do so in the following denominations: 6, 5, 4, and 2.
BAM!: Each card in Green Goblin’s deck has a BAM! effect. His unpredictable movement will make it difficult to know if he’ll land on a Location with Heroes. We’ve mentioned Green Goblin’s BAM! effects and his henchmen’s BAM! effects in previous sections. They are plentiful and a large portion of how this villain accomplishes his win condition.
Special Effects on Cards
1) Goblin Formula: As long as this card is faceup in the Storyline, Green Goblin has 1 extra Health and deals 1 extra damage with his BAM! effect.
“Goblin Formula” turns Green Goblin from a villain with average damage to one of the deadliest Marvel United villains. Since he has a BAM! effect on each of his cards, Green Goblin will damage Heroes if he lands on them. “Goblin Formula” boosts his damage by one with each copy in play, and Green Goblin has two copies of the card in his Master Plan deck.
If both copies of “Goblin Formula” are in play, Green Goblin can knock out a Hero with a single BAM! effect, making the Heroes’ margin for error smaller.
2) Kidnap: If there are any Civilian tokens in Green Goblin’s Location, take 1 and place it on his dashboard.
“Kidnap” is less dramatic than “Goblin Formula” and only matters when Green Goblin can be damaged. As long as a Civilian is on his dashboard, Green Goblin cannot be damaged. Heroes can rescue the Civilians on Green Goblin’s dashboard even if he cannot take damage by spending two Heroics.
This effect is thematic (Green Goblin often kidnaps people) but not nearly as annoying as Vulture’s ability; Vulture doubles down on kidnapping Civilians. Green Goblin’s “Kidnap” can be annoying as well, but in order for it to trigger, there needs to be a Civilian token at Green Goblin’s Location when the effect occurs. I’ve found this effect to fizzler more than and others, and when it does happen, it’s more of a nuisance.
General Strategy
Green Goblin becomes more difficult with more players. As such, Goblin may be the one villain in Marvel United (MU) that scales the worst. More Heroes means that Green Goblin (and his plentiful henchmen) have more chances to damage Heroes.
Keep in mind that the Heroes lose if anyone runs out of cards and Heroes discard cards whenever they receive damage. According to the MU community, the player win rate against Green Goblin is 30%. One of the worst. Green Goblin should not be the first villain you play in Marvel United.
That said, I’d play with fewer Heroes and stick to the Spider-Man theme. Heroes and the Locations in the Enter the Spider-Verse expansion work well against Green Goblin. Many of the End of Turn abilities on Locations grant the Heroes extra action tokens and the fact that the board doesn’t begin the game with Threats, means that you’re likely to gain extra tokens at the beginning.
You’ll need to manage the Threats. It can be tempting to keep “Electro” around like I said, but the Heroes lose if all the Locations have Threats. I also mentioned the Spider-Verse Locations and their tokens (Heroics and Attack) because you may need those tokens and specialize in Move. You’ll need plenty of Move to reach these Threats and rescue Civilians/defeat Thugs before Green Goblin wins.
Spider-Man has plenty of Move in his deck and his “Great Power” and “Great Responsibility” can generate even more tokens. “Great Responsibility” also negates Green Goblin’s Special Rule, “If you are in his Location, you can use Two Heroics to rescue a Civilian here,” since Spider-Man doesn’t use Heroics to rescue Civilians with “Great Responsibility;” he rescues Civilians no matter how many Heroics are required for a rescue.
Ghost-Spider can manipulate where Threats are placed and that can come in handy. And Miles Morales can delay the Villain’s turn—also a great ability to have. If you were to go against the Spider-Man theme, Captain America (from the core set) is a great option. He generates Wild tokens and has a fair amount of Heroics and Attack.
The rest may come down to luck. Since Green Goblin has multiple ways of winning (KOing Heroes, delaying Heroes from winning with kidnapping Civilians, and working toward his secret mission by placing Threats), he may not draw into the winning card for his closest win condition.
You’ll finish the Clear Threats mission for sure. The second mission you finish will depend on team composition; play to your Heroes’ strengths. Green Goblin generates Civilians and Thugs at an even rate.
Remember to time completing the first and second missions as close together as possible to avoid the villain speeding up too soon.
She may not have as extensive a rogues gallery as Batman, but the first lady of superheroes has some interesting villains of her own. The Wonder Woman feature film’s out today so let’s celebrate with our list of the Amazon Princess’s greatest villains.
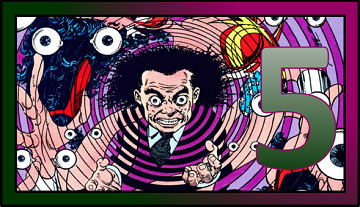
5: Doctor Psycho
Okay. He’s got a goofy name and an even stranger appearance but Doctor Psycho has developed into one of Wonder Woman’s best enemies. He wants to control Diana Prince and for that Doctor Psycho may be the quintessential Wonder Woman villain. She combats stereotypes. She vows she won’t be dominated by any man—or woman for that matter—and Doctor Psycho yearns for Wonder Woman at his heel. He’s pretty much an allegory for misogyny and chauvinism. Or perhaps its physical manifestation. Maybe that’s why he’s a small man.
4: Maxwell Lord
This one may be a bit of a cheat. Maxwell Lord is a Wonder Woman villain, he’s gone toe to toe with her countless times, but his influence extends beyond just her. At one point Maxwell Lord reinstated the Justice League with new members and waited years to hatch his plan for world domination. Talk about a long con. He’s a manipulative bastard and a perfect complement to Wonder Woman’s lasso of truth. Wonder Woman didn’t catch Lord’s elaborate lies until it was too late. Maxwell Lord would make a good villain in a future Wonder Woman film.
3: Ares
Ah, we finally get to the villain of the first Wonder Woman movie: Ares. No one should question his power. Ares is a god. He certainly has more than enough power to take on the Amazonian princess. He also has personal reasons to target her. His and Diana’s relationship has changed with each iteration of Wonder Woman. Sometimes Ares is shunned by the Amazons, forced to impose his will on the world of man. Other times he’s an uneasy ally. Regardless, he has personal ties to the character (he’s her uncle). One of my favorite Ares stories comes from Brian Azzarello’s New 52 run when Diana must take Ares’s place in Olympus. No matter what the story, Ares is usually a compelling foil.
2: Circe
Circe is to Wonder Woman what Black Mask is to Batman. She’s Diana’s dark negative. While Wonder Woman defends her sisters while trying to understand the world of man, Circe wants to sow distrust and watch the whole thing burn. Both are princesses of the ancient world. Both have ties to Greek gods. (Wonder Woman is one of Zeus’s many children and Hecate uses Circe as her revenge against the gods.) Both have reasons to distrust man. But Wonder Woman can overcome her distrust and foster understanding. Circe refuses. She’s formidable. Occasionally, she tries to coax Diana to her way of thinking. The fact that she may have a point at times makes her another great villain. But she’s not Wonder Woman’s number one.
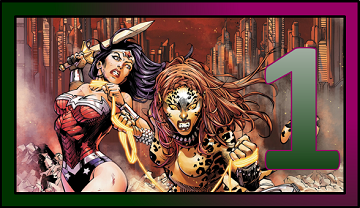
1: Cheetah
Barbara Ann Minerva (Cheetah) and Diana Prince have a long, complicated history. Barbara is an anthropologist who wanted—in most DC realities—proof of the Amazonians’ existence so she’s thrilled when she befriends Diana. Wonder Woman is living proof Amazons not only existed, they continue to thrive. But usually, Barbara’s curiosity (of wanting to find Wonder Woman’s home Themyscira) gets the better of her and she suffers the curse of the god Urzkartaga who transforms her into a half-woman, half-cheetah being with superhuman powers. Of course, the story changes from one reality to another but this is the main gist. The two faceoff a lot and their former friendship often colors their battles. These confrontations tend to get personal.
There were several villains who didn’t make the list. Giganta just missed it. I disqualified The First Born from Azzarello’s run because I haven’t seen him in any other Wonder Woman story arc but the one he was in was amazing. Seriously, you should try the New 52 Wonder Woman trades volumes 1-6. You won’t be disappointed.
Did we get the list right, for the most part? Let us know in the comments. Thanks for reading.
I got into iZombie because of its genre blending: murder mystery, zombies, comedy, and police procedural. I’d rate the four facets in that order. Last season was fantastic in terms of pacing and an un-CW lack of a romantic focal point. Season three started with some speed bumps, but “Dirt Nap Time” continues this season’s upward trend.
The weekly mystery (the main source for the police procedural side of things) has yet to click, Liv gets a vision that solves the investigation and little detective work is needed, but the ongoing plots of humans finding out about zombies and the zombie cure works—for the most part. I still don’t like how zombie existence was first uncovered: discarded brain paste tubes. People will get suspicious when they find a used brain tube in someone’s trash. The continuance of this storyline has worked out a lot better.
In fact, humans investigating the existence of zombies serves as another mystery layer. “Dirt Nap Time” ended with a potential smoking gun for zombie existence. I would’ve liked iZombie to channel Columbo and play up the investigation with the audience knowing the solution but not knowing how the detective(s) will solve the mystery. Still, it played out well enough.
The zombie cure thief remains a mystery and that’s a great thing. There are plenty of suspects: Blaine (he can’t be ruled out completely), Blaine’s dad (Donnie doesn’t know anything but his boss might), and the Zombietopia (who else would not want a cure for zombieism on the open market?). This long play could sustain iZombie to the season finale or beyond.
I’m not sure I buy into Major’s desire to stay with the Zombietopia. It makes sense that he wouldn’t have many options as a suspected serial killer, but Major ended up in three or four situations where he could’ve been found out as a human. He won’t, and shouldn’t, be able to keep up this charade. It’s a little fun guessing when that’ll happen but it’s too convenient from a plot standpoint for him to dodge detection. Like I said, there were three to four situations in thirty minutes where he could’ve, and probably should’ve, been unmasked and something or someone was in the right place at the right time.
The elementary school teacher brains Liv was on this week provided some laughs and a nice bend to Liv’s base personality. The brain influences Liv experience each week work best when they serve to nudge her in a direction. They don’t work when they take over her personality. Was Liv over-the-top a few times? Yes. Was she completely out of character? There’s an argument for no and this may be the first time that can be said this season. iZombie has descended into Liv’s meals as deus ex machina, laugh factories, or both. “Dirt Nap Time” could be accused of this too, but at least it isn’t as blatant.
iZombie still has plenty of rough patches but it continues to be one of the more watchable shows on the CW. “Dirt Nap Time” did enough to hold my interest.