

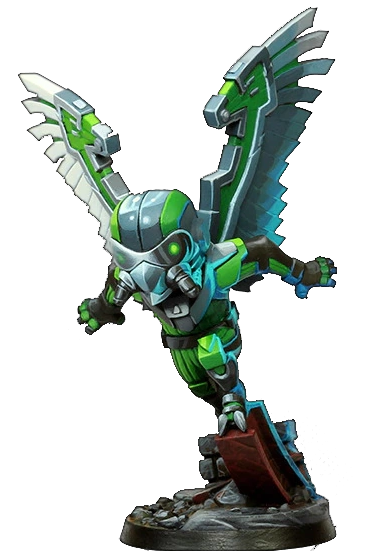
Real Name: Adrian Toomes
First Comic Book Appearance: The Amazing Spider-Man (May 1963)
Affiliations in Comic Books: Sinister Six
Marvel United Appearance: Marvel United: Return of the Sinister Six (July 2020)
Marvel United Team Decks: Sinister Six
Movement

BAM!

Civilians

Thugs

How Vulture Plays: Vulture attempts to steal technology (Spoils) from the in-play Locations. Stolen Crisis Tokens (Spoils) go on Vulture’s dashboard. Every game begins with 18 Crisis Tokens total (3 per Location), so the fewer Tokens Vulture needs to achieve his Villainous Plot, the easier it is for Vulture to complete it. Vulture has many ways of “stealing” Crisis Tokens. He has a handful of cards with BAM! effects (5), his Overflow will trigger him to steal 1 Crisis Token, and his henchman Threat “Sandman” can be a nuisance.

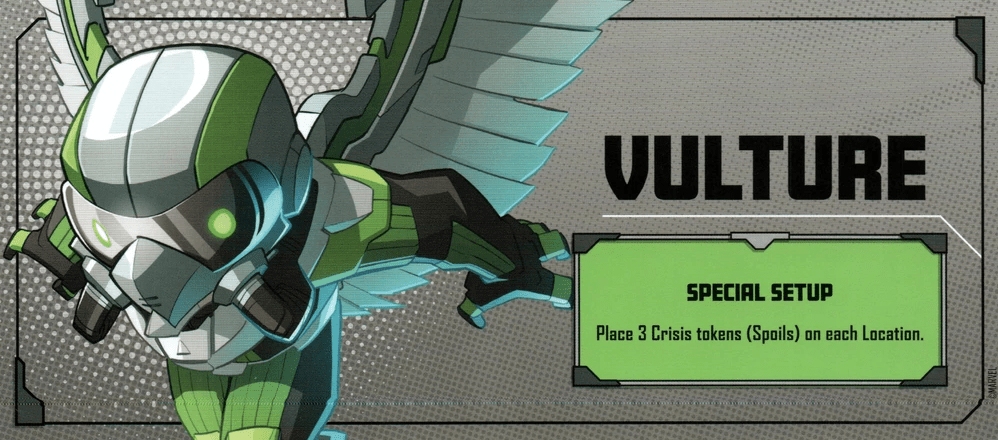
Special Setup: Place 3 Crisis Tokens (Spoils) on each Location.

Villainous Plot: The Heroes lose if Vulture has obtained enough Crisis Tokens (Spoils):
2 Heroes: 9 Tokens
3 Heroes: 7 Tokens
4 Heroes: 5 Tokens
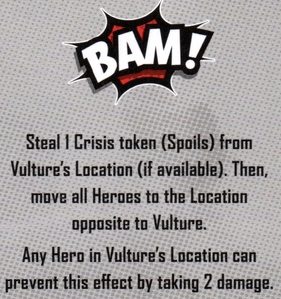
BAM!: Steal 1 Crisis Token (Spoils) from Vulture’s Location (if available). Then, move all Heroes to the Location opposite to Vulture. Any Hero in Vulture’s Location can prevent this effect by taking 2 damage.
It may seem odd, but players may want to take two damage to avoid Vulture stealing a Crisis Token, especially at higher player counts where it takes fewer Crisis Tokens for Vulture to win. Vulture can win at a 4 Hero count if all his cards with BAM! effects resolve without the heroes taking damage. Fewer Heroes have more wiggle room and can allow a BAM! effect or two to slip through.
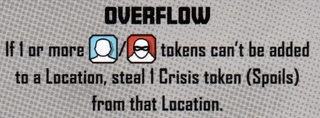
Overflow: If a civilian or thug token can’t be added to a Location, steal 1 Crisis Token (Spoils) from that Location.
It doesn’t matter how many tokens can’t be placed due to Overflow, Vulture will only steal 1 Crisis Token (Spoil) from each instance of Overflow. This gives the Heroes a fighting chance.
Threats
Vulture has 2 copies of 2 different Threat Cards, and 1 copy of 2 different Threat Cards.

Kraven (Henchman)
Health: 4
BAM!: Deal 2 Damage to 1 Hero in this Location.
“Kraven” deals a strong 2 Damage to Hero. Heroes may want to avoid his Location or clear him as a threat because they won’t be able to negate Vulture’s BAM! effect (by accepting 2 Damage) if they also received 2 Damage from “Kraven.”
I prefer avoiding “Kraven.” He’s not as menacing as some of Vulture’s other Threat cards.

Sandman (Henchman)
Health: 4
BAM!: Deal 1 damage to each Hero in this Location. If there are no Heroes in this Location, steal 1 Crisis Token here.
“Sandman” tempts the Heroes to split up. Vulture zooms around the board, and he has a special effect “Heist Plan” that also suggests that Heroes should split up. I would clear “Sandman” before I would clear “Kraven.” Sandman has a high priority because he plays into Vulture’s Villainous Plot.

Electromagnetic Wings (Threat)
Clear: 3 Heroics
Constant Effect: If Vulture is attacked here, he only takes 1 damage and immediately moves to the opposite Location.
“Electromagnetic Wings” doesn’t come into play until late game. This Threat does more to slow down the Heroes’ attacks. If the Heroes don’t use action(s) with a lot of Attack, “Electromagnetic Wings” won’t have as large of an effect. That said, “Electromagnetic Wings” has the second highest priority to “Sandman.” At least one copy of “Electromagnetic Wings” should be taken out before the Heroes begin attacking Vulture to minimize Vulture’s damage resistance.

Grenade Bombing (Threat)
Clear: 3 Heroics
Triggered Effect (Vulture ends his movement on this Location): Each Hero in this Location takes 2 damage.
“Grenade Bombing” requires two things to be true: Vulture needs to land at its Location, and one or more Heroes need to be at the Location. This specificity works against “Grenade Bombing.” Like “Kraven,” “Grenade Bombing” can dole out a bunch of damage, and that’s not good, but the Threat can be avoided. If you plan to finish the Clear Threats mission, I advise clearing “Sandman,” then both copies of “Electromagnetic Wings,” and one copy of “Grenade Bombing.”
“Grenade Bombing” has a higher priority than “Kraven” because it can affect more than one Hero a turn.
Master Plan Deck
Movement: Vulture averages 3 Movement each turn. He is twice as fast as any of the core set villains. His movement varies, he has 4 cards with speeds of 1, 2, 4, and 5 and 4 cards with speeds of 3. There’s a good chance that Vulture will lap the board five or six times in a single game.
Civilians:
Vulture adds a fair number of Civilian Tokens. Usually, he will only add two tokens (Civilian/Thug) to one Location at once, but he has one card that will add as many as three tokens to a single Location.
Thugs:
Vulture adds an even number of Civilian and Thug Tokens. Again, he usually adds two tokens to one Location at once, but he does have one card that will add as many as three tokens (two Thugs/one Civilian) to two Locations.
BAM!:
Fortunately, Vulture uses his BAM! effect on five of his twelve Master Plan cards. But he does have other ways to steal Crisis Tokens from a Location. His special effect “Heist Plan” is one of those methods.
Special Effects on Cards
Heist Plan: If this is not the first Heist Plan card in the Storyline, steal 1 Crisis Token from each Location without Heroes.
“Heist Plan” is the crux of Vulture’s Villainous Plot. The first copy of “Heist Plan” does nothing, but every subsequent copy of “Heist Plan” that gets played will steal 1 Crisis Token from every Location without a Hero. This can get deadly, and this is why the Heroes should consider splitting up. The more Locations the Heroes occupy, the fewer Tokens Vulture can steal.
Vulture has four copies of “Heist Plan” in his deck, so he can easily complete his Villainous Plot by playing two or three “Heist Plans.” But there is a way to minimize the “Heist Plan” further. If Vulture (or some other effect like Heroes discarding Crisis Tokens) reduces a Location’s Crisis Token to zero, the Heroes won’t need to guard that Location from “Heist Plan.” There’s nothing to steal.
General Strategy
Vulture’s abilities center around stealing Crisis Tokens. His ability to steal multiple Crisis Tokens in a single round makes quickly finishing missions important. We’ll cover how to deal with this ability later. First, let’s discuss which missions you should try and complete.
Vulture adds a modest number of Civilians and Thugs but never too many to worry about Overflow each round. Keep at least two spaces open on every Location. Rescuing Civilians and Defeating Thugs will get you closer to finishing these two missions and prevent Vulture from causing an Overflow that can result in a lot of stolen Crisis Tokens.
Since Vulture doesn’t add too many tokens, you may want to play with Locations that begin the game with plenty of Civilian/Thug tokens. This will give you options for finishing the Rescue Civilians and Defeat Thugs missions. The following are Locations from the original Marvel United release that start with three or more tokens:
From the core set:
Stark Labs (3 Tokens; space for 4)
New York Police Headquarters (3 Tokens; space for 4)
Times Square (3 Tokens; space for 5)
S.H.I.E.L.D. Helicarrier (3 Tokens; space for 5)
Central Park (4 Tokens; space for 5)
From the Guardians of the Galaxy Remix expansion:
Knowhere (3 Tokens; space for 5)
From the Rise of the Black Panther expansion:
Warrior Falls (3 Tokens; space for 5)
If you choose to finish the Clear Threats mission, the following is the order I suggest for clearing threats:
1) “Sandman”: His ability plays into stealing Crisis Tokens
2) Both copies of “Electromagnetic Wings”: You don’t want Vulture negating your Attack and zooming to another part of the board
3) One copy of “Grenade Bombing”: “Grenade Bombing” has the potential for dealing more damage than “Kraven.”
4) “Kraven”: He deals a lot of damage but can also be avoided.
So, how do you prevent Vulture from stealing Crisis Tokens? First, don’t allow any Overflow effects to occur. Second, get rid of “Sandman” whether you intend to finish the Clear Threats mission or not. Third, play with Heroes who can delay the Villain’s turn or rush Vulture before he can complete his Villainous Plot.
You can’t avoid Vulture’s “Heist Plan.” Its effects will go off as soon as it’s played. The first instance of “Heist Plan” doesn’t result in any stolen Crisis Tokens. Many other Marvel United villains own a card that can be deadly if played on turn one. Vulture needs at least a second turn for “Heist Plan” to get ugly. This is a small mercy.
Characters who can rush Vulture or delay him:
From the core set:
Black Widow (Manipulate the Villain deck)
Captain America (Wild Tokens for teammates)
Captain Marvel (Attack in adjacent Locations)
Iron Man (Extra Tokens)
Wasp (Extra Move and Team movements)
Staying on theme and from the Enter the Spider-Verse expansion:
Miles Morales (Delay Villain turn)
Spider-Man (“Great Power” and “Great Responsibility” are too good)
From the Rise of the Black Panther expansion:
Black Panther (a lot of Move and bonus symbols)
Shuri (Wild tokens and healing damage)
From the Tales of Asgard expansion:
Beta Ray Bill (“Stormbreaker’s” flexibility to use its extra attack on a single target or multiple targets)
I wouldn’t bother discarding Crisis Tokens; you most likely won’t be able to discard enough Crisis Tokens fast enough. You can still try discarding Crisis Tokens. Marvel United characters from the X-Men release and Multiverse release have this ability. I prefer character abilities. If you don’t have characters with discarding Crisis Tokens abilities, you can try using the Locations S.H.I.E.L.D. Headquarters (from the core set) and the Great Mound (from the Rise of the Black Panther expansion) and their “End of Turn” abilities. Both Locations result in a Hero damaging themselves to discard a Crisis Token. Not the best idea, considering that Vulture has ways of applying two damage to a Hero in a single turn. You’re best served trying to rush Vulture.
As with any Marvel United villain, remember to time completing the first and second missions as close together as possible to avoid Vulture from speeding up too soon. You want as few occasions of “Heist Plan” as possible.
